

You can buy this right here.
The D&D designers put together this product and put it on the DMs Guild. The proceeds go to charity.
What is it? It's an adventure! I had seen the title and assumed it had alternate rules for putting together war machines for Descent into Avernus, so I never really gave it a look.
It turns out that this is a big adventure that draws from tons of old products! My favorite! I also is somewhat linked to the Lost Laboratory of Kwalish, an adventure that I think is a lot of fun.
Let's go over what's in the book so you can see if it's something you'd be interested in. Then I'll give my overall thoughts at the end.
This an adventure for characters of 5th to 10th level.
Backstory:
- The craft from Barrier Peaks crashed.
- Kwalish turned the ship into his lab.
- A device had been stolen from it: The Infernal Machine of Lum the Mad.
- The machine allows the ship to travel time and space.
- Some of the machine's control buttons are missing.
- Archdevils Zariel and Bel both want to find the control buttons so that they can rebuild the machine and use it for their own nefarious purposes.
- The heroes are making their way through the woods and come upon a unicorn in conflict with 3 dryads.
- The group explores a clock tower nearby that contains magic components.
- An agent of either Bel or Zariel asks the group to find the other pieces.
- The heroes travel through time to the Tomb of Horrors, back when it was still being built.
- Then they go to the Temple of Moloch, which is run by Thessalar.

Aa coven of green hags has grafted myconids into trees. A unicorn named Banrion opposes them.
The unicorn lurks in the ruins of city where the Infernal Machine once stood. "A fallen clock tower still holds some of the machine’s components, which retain enough power to manipulate time."
Sunbeams: There's a great encounter here that cracks me up. SINISTER SUNBEAMS shine through the trees, acting a magic tripwires that can awake a corrupted treant. There's something... not right about those sunbeams. Almost... sinister.
Acorns: Exploring the forest could result in "heavy, spiked nuts the size of mace heads" to fall from the trees.
The hags want the group to capture the unicorn by using a new magic item: a bridle of capturing.
Chapter 2: An Invitation Extended
The group will probably end up as allies with either Lync Creatlach or Sir Ursas.
Lynx Creatlach: Tiefling rogue, collects antiquities for the service of noble causes.
Lynx has pulled a component from her version of the Infernal Machine and installed it in a magical construct resembling a silvery skeleton with decorative wings, nicknamed Eludecia.
That is a deep cut! This refers to an adventure about a succubus paladin that Bart Carroll worked on way back in 2006!
In the very back of this book, there is an entire page devoted to explaining what products all of these little references come from. Love it!
Sir Ursas: A massive warrior with one arm replaced with the paw of a grizzly bear.
"Ursas proudly claims to be the very figure depicted in A Paladin in Hell—a painting that has become famous throughout Faerûn—and that he lost his arm on that expedition, fighting the forces of the archdevil Zariel."
Monte Cook wrote a classic adventure about A Paladin in Hell.
Chapter 3: Construction of Horrors

We start off with the origin of the legendary villain Acererak:
- Acererak was a tiefling fathered by a balor named Tarnhem.
- Acererak studied under Vecna and became an evil archmage.
- While researching how to become a lich, he built dungeons and tombs, including the Tomb of Horrors.
- Acererak became a lich.
Tarnhem: Wow. Acererak is sacrificing his own father, Tarnhem the balor, to help empower the tomb.
Moghadam has a rival - Thessalar. Moghadam has sent thieves to Thessalar's Temple to steal the gems from the Moloch statue - the iconic image on the cover of the 1e Player's Handbook. The gems are meant to be used in the creation of Acererak's demilich skull! Crazy.
There are some other NPCs lurking in or near the Tomb, including Phenex, an incubus cleric of Vecna. He has a second set of arms - grafted-on girallon arms.
Manipulating Time: The group can explore this area, using their "mechanical guide" device to manipulate time, which moves bad guys around and/or changes the area in some way.
The group can meet with Moghadam, who is not overly loyal to Acererak.
Area 5: "Commissioned by Acererak, the wizard Tuerny built these controls for the balor's prison in area 6."
We get a little box explaining who Tuerny was. "According to lore, Tuerny became a nalfeshnee demon before vanishing from history." I'm pretty sure there was an adventure in one of those weird online-only end-of-3.5 Dungeon magazines that explained that Tuerny had actually become a demon lord on his own.
6. Captive Balor: Acererak's father, the balor known as Tarnhem, is trapped here. Acererak has "...fashioned a device from a sphere of annihilation that slowly drains away Tarnhem's essence to fuel the magical workings of the tomb." If Tarnhem is released, the magic binding him becomes a sphere of annihilation and travels through the tomb at random! I love that.
7. Forsaken Prison: Nolzur is here! His alchemical blood is being drained to create the magic pigments used to paint the tomb's murals. This is crazy stuff. If things go well, Nolzur can give the heroes extremely cool items - tiny versions of themselves that can complete small tasks when the heroes are asleep.
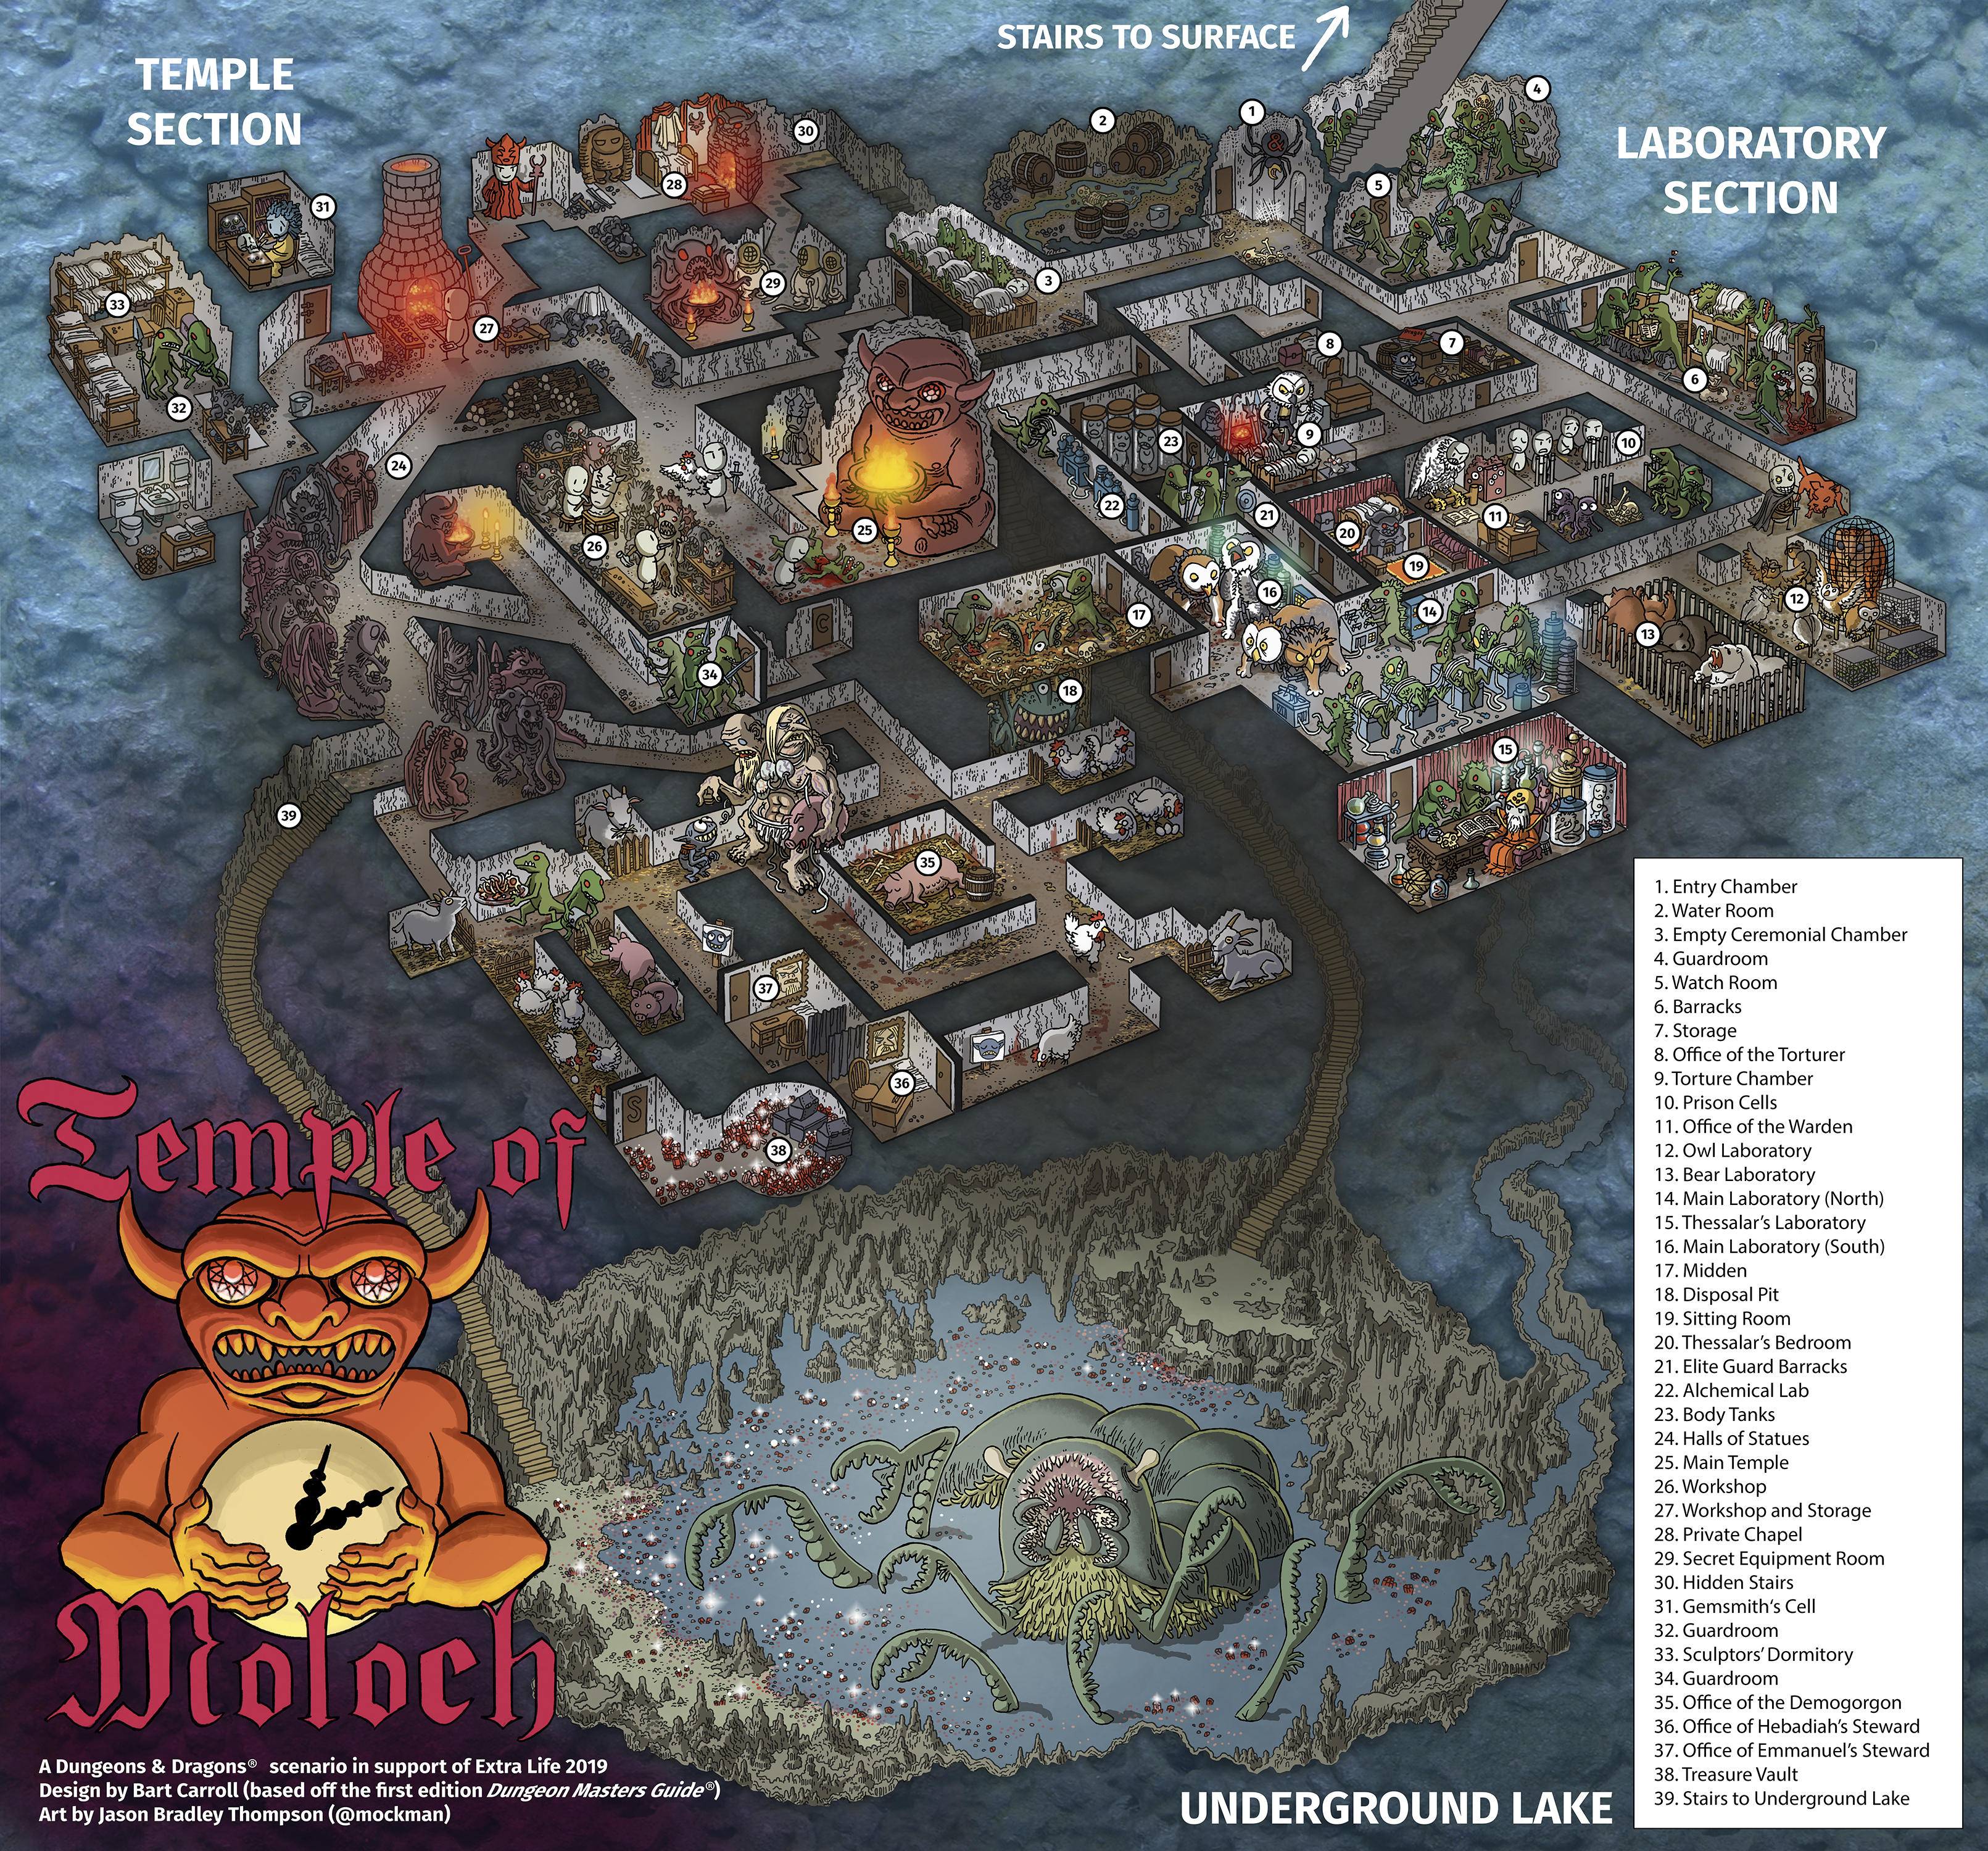
Chapter 4: Temple of Moloch

The temple is the former home of Thessalar, a necromancer/alchemist/monster-maker. Thessalar's blood possesses dire magical properties.
History of the Temple of Moloch:
- The temple is built in a cavern where Olhydra and Ogremoch once battled.
- The cavern contains portals to the planes of Earth and Water.
- There is a stream that carries gemstones of extreme size and qualities.
- Ancient people built a temple to Moloch here, which includes the famous statue.
- Centuries later, Thessalar took the temple over and repurposed the temple for his own needs.
- He created many monsters here, including the thessalhydra and the owlbear (!).
- Moghadam, the guy building the tomb, is a rival of Thessalar's.
Thessalheart Construct: A mechanical device that struts about like a chicken, with a human heart beating behind its glass front. The heart in it is connected to the thessalhydra that lurks in the dungeon. If the thessalhydra is slain, it comes back to life in 1 hour thanks to the magic of this construct.
15. Thessalar's Laboratory: Thessalar himself is here. There's also some experimental stuff:
- "A miniaturized human lies in apparent stasis in a windowed glass case."
- "A vermiform pseudodragon twists and crawls about inside a large crystal tank."
23. Body Tanks: This room contains clones of Thessalar floating in glass tanks filled with fluid.
25. Main Temple: In here is the famous statue. The gem eyes are connected to the magic of the temple, and removing them causes, uhh.. multiple disasters. Don't want to spoil it!
31. Gemsmith's Cell: A genasi named Seodra is being forced to create the skull of a demilich. Very cool. Thessalar plans to use the skull for his own ascension to lichdom, either as his lich's phylactery or as the skull of a demilich.
Chapter 5: Final Showdown

Appendix C: New Magic and Special Items
Tons of cool stuff in here! Here are some of my favorite things.
Blood of the Lycanthrope: Inject this into someone and they become a lycanthrope if they fail a saving throw!
Thessaltoxin: A poison that causes the victim to polymorph into either a random form or a creature it has seen within the last 24 hours.
New Spells: There are even new spells, including Summon Greater Demon, which lets you summon a demon of CR 5 or lower.
Claws of the Umber Hulk: Gauntlets that give you a burrowing speed and can be used as a melee weapon.
Ioun Stone of Vitality: +1 to death saving throws.
Ruinblade: "A small jade version of the green devil face of the Tomb of Horrors is fashioned into the hilt of the weapon." It's a +2 sword that can cast blight and disintegrate!
"The weapon's purpose is to ruin and unmake existing objects..."
Spell Gem: A gem that can contain one spell from any class's spell list. You can cast the spell in it as an action if the spell is on your class list.
The Infernal Machine of Lum the Mad: This is an artifact! It has the power to bend the nature of reality "...with the proper combination of controls recreating the effect of a wish spell (including all side effects)."
Wow.. whoever is attuned to it gains 1d4+1 beneficial properties and 1d4+1 detrimental properties. There's charts for both!
Beneficial properties include:
- You summon a unicorn that obeys your commands.
- You have a +1 bonus to attack rolls with weapons or spells.
- While you take a short rest, the area within 50 feet of you takes on the illusory appearance of a beautiful forest glade.
- All animals despise you.
- Metal rusts in response to your touch.
- An exact duplicate of you appears next to you, dressed as you but lacking any gear. It loudly tries to convince all other creatures that it is you, and you are its familiar.
Right at the end is a page that lists the sources for all of the stuff in this adventure. It's an amazing list.
Overall
So is this worth $10? Yeah, I think so. This is packed with stuff you can use. The magic items are awesome, the dungeons have some very cool encounters (I really love the thessalheart construct), and in general I really like it when they refer to and build on adventures and products that have come out in the past.
I have three minor complaints.
1. Dungeons Are Too Big: I'm not sure if traditional dungeons "work" any more. They're too big for most groups, and they get boring fast. Maybe that's just me. I'm very done with meaningless combats in hallways with guards.
2. The Name: They really need to rename this product. I literally didn't know it was an adventure. Maybe I'm just missing something.
3. The Tomb: I am totally done with the Tomb of Horrors. Enough already!
No comments:
Post a Comment